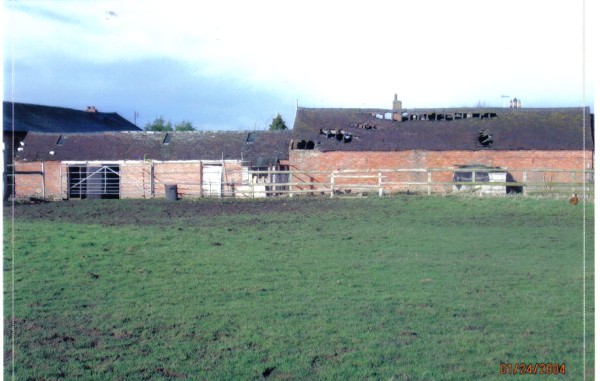
Home 

The Well Cottage Timeline 

January 2004 to present


Our Well House building project has been ongoing for a few years now and there have been some memorable points and some not so memorable ones along the way going right back to when we first saw it for sale and for some insane reason bought it. 

We thought that it would be useful for people to see what happened when and in which order and we hope that this timeline will help to show just that. 
 

January 2004
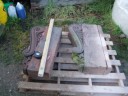
Alison first saw the old barn advertised for sale, she made an appointment and we went to see it. We decided there and then to make an offer which was accepted, although I still don't know how we managed to get the bank to agree to lend us the money?

Click to see more pictures and information about this topic


February 2004
Our solicitor advises us that these sort of purchases always take a lot longer than buying a normal house so we should be prepared for the sale to take several months to complete!


April 2004
Contracts are being handled between both parties solicitors. 


May 2004
Contracts are still being handled between both parties solicitors. 


June 2004
We have now paid our solicitor the 10% of purchase price deposit as generally required for this type of "agricultural" transaction as part of the exchange of contracts and we are waiting to get the completion date.


June 2004
Contracts are exchanged, now it is just a case of waiting.


July 9th 2004
Everything is completed and we now own a very dilapidated and derelict cow shed.

 More pictures and information about this topic will be available soon


July 2004
We had a site meeting with Philip Heeks The Architect and with the builder who was going to carry out the work, apparently all was looking good for a possible completion by Christmas 2004 if the weather was on our side.


Early August 2004
Part of the purchase agreement is that we have to erect a post and rail fence 4 foot 6 high around our boundary before any work can commence because our neighbours had horses in the field next to us. Putting the fence up ourselves seemed like a good idea at first but it was very hard work.......all I can say now from experience is that if you can afford to pay someone else to do this for you then it will be well worth the money.

More pictures and information about this topic will be available soon


Late August 2004
The builders arrived on site and work started!

More pictures and information about this topic will be available soon


September 2004
Unfortunately we had a planning problem and work had to stop completely.....completion by Christmas 2004 was no longer on the cards and in fact we suddenly found ourselves with no idea when work could start again.

More pictures and information about this topic will be available soon


Winter 2004
Christmas came and went but still not resolution to our planning problem


Spring 2005
The planning issue had not been resolved


Late May 2005
Hurrah! at last our planning problems are almost sorted. Now to comply with the conditions of our new planning permission we just need to get the new building regs, the materials (samples of the additional bricks and roof tiles to match the existing)and the boundary treatments (type of fencing, heights, and where it will be situated) and our septic tank and soakaway all approved by planning and then the building work can start again.


June 2005
Terry the surveyor submits the full building regs to planning for approval.


June 2005
Iestyn submits the proposed building materials documentation to planning which needs to include actual samples of the original cheshire brick and blue clay roof tiles along with samples of the additional reclaimed bricks and rooftiles which will need to be used to make up the materials for the building work.


June 2005
Iestyn submits the proposed boundary treatment documentation to planning including land registery plans and site drawings showing the various neighbouring boundries and with photographs and details of the exact types of fencing what heights they will be and the materials to be used. This level of detail is required because our land is in green-belt open countryside so we are restricted as to what we can or can not do.
The back garden which was open fields and for planning purposes the part near the house where the first post and rail fence runs is now classed as forming part of our property under the planning permission. However the rest of the garden (the small paddock) going away from the house is green belt. So for example, we could put up a pig arc (those little curved corrugated structures you see in fields in the  countryside that look like little Anderson air raid shelters) in the paddock but we can't put up a garden shed without planning permission because the garden is classed as agricultral countryside and not a garden. 


July 2005
Out in the countryside there is often no sewerage as you would find in towns so people have to have their own personal sewege treatment plant on site, commonly known as a septic tank which is basically a huge fiberglass bottle buried in the ground where your waste water goes into and is broken down over time by the bacteria that form in the tank and out of the soakaway buried in the ground at the other end of the tank trickles cleanish water which then soaks back into the ground. When we bought our house we had an option to connect into a neighbours septic tank for our drainage. Unfortunatly planning advised us that they were concerned that the neighbouring septic tank could not support our house as well as the one it was already supporting. The only option to comply with this planning requirement now was for us to have our very own septic tank.


July 2005
We need to conduct porosity tests so that Terry the surveyor can calculate the soakaway capacity requirements for the septic tank and drainage designs which will need to be approved by planning, so we dig the test pits, carry out the specified tests and record the results.

Click to see more pictures and information about this topic


Late July 2005
Building regs, materials, septic tank design and boundry treatments have all been approved and confirmed back to us by planning so let building work commence...........


Late July 2005
On site meeting with our Architect Philip Heeks and the builder, things are starting to get exciting now.


August 2005
Building work will start imminently so we set about rescuing as many of the old cobbles as we can from the piles of buiding spoil.

Click to see more pictures and information about this topic


August 2005
The builders arrive and start to clear the site and demolish the remainder of the old barn before they start the re-build process.

Click to see more pictures and information about this topic


September 2005
The septic tank is installed

Click to see more pictures and information about this topic


September 2005
The foundation trenches are cut

Click to see more pictures and information about this topic


September 2005
The  foundations and footings go in

Click to see more pictures and information about this topic


September 2005
Alison and Iestyn restore and conserve the old oak timbers that they want to be re-used in the house.

Click to see more pictures and information about this topic


September 2005
Walls start to appear

More pictures and information about this topic will be available soon


October 2005
The building is taking shape, window frames are being fitted and the blockwork and brickwork is getting up to roofline level. 

More pictures and information about this topic will be available soon


October 2005
The oak timbers are now ready to be taken to site for fitting.

 Click to see more pictures and information about this topic


November 2005
The timber roof framework is built and then the sarking and old blue clay tiles are fitted. 

More pictures and information about this topic will be available soon


November 2005
The underfloor heating is installed

Click to see more pictures and information about this topic


November 2005
The bare block wall behind where the AGA will go now needs to be boarded and plastered before the AGA arrives. 

This piece of work is where Iestyn and Alison's very first introduction to project management starts, they are now responsible for every aspect of the management and coordination of the AGA installation from he onwards.


November 2005
The wall having been plastered the flue specialists can come and build the special AGA flue. This work has to be carried out by a certified specialist and the work will later be inspected by building control so the flue work comes at a hefty cost.


November 2005
The AGA arrives and is built on site

Click to see more pictures and information about this topic


November 2005
The builder finishes his work once the basic shell of the building is complete with the roof on.


November 2005
Alison and Iestyn now take over complete project management of everything for the rest of the build....

Oh, it'll be a doddle, just like that Grand Designs TV program.

More pictures and information about this topic will be available soon


November 2005
The bunded (double skinned and leakproof) oil tank is professionally installed and filled up so that we can get the AGA up and running.


November 2005
The AGA is commissioned (it runs on gravity so does not nead any electricity and as long as there is oil in the oil tank it will run). We have some heat at last, the house is like a fridge to work in and you can thaw out on the AGA and make a warm drink to keep you going.

Click to see more pictures and information about this topic


November 2005
Alan Bradbury comes to sort out our drainage and connect up the septic tank.

More pictures and information about this topic will be available soon


December 2005
Iestyn starts fitting all of the Kingspan insulation boards in the roofspaces throughout the house.

More pictures and information about this topic will be available soon


January 2006
Tony and Craig the electricians and Phil Gregory the plumber arrive to do the first fix electrics and plumbing.

More pictures and information about this topic will be available soon


February 2006
The joiner arrives for the first fix joinery and Iestyn has a sharp lesson in the problems of project management.

We had agreed with the joiner that we will pay him on a day rate and that we will supply the materials (various cuts of timber 3x2, 6x4 etc).

When the joiner arrived he asked Iestyn where the timber was and what was required and this he was shown.

The joiner then turned to Iestyn and said "so that's the timber but what about fixings? I need two boxes each of 4" 10's and 3" 10's (4" and 3" cross head screws to you and I), a Kilo of 5" nails and a couple of packs of brown rawle plugs, I take it you don't have these?".

"Er...no" was Iestyn's reply, "I thought you'd supply your own screws and nails".
 
The joiner replied "No, I'm on a day rate working for you and you agreed to supply the materials, that includes the screws and nails, if you had wanted me to supply these then I would have quoted for them, it's not my fault you didn't ask me about this and I thought you'd know, I'm used to this all being ready for me when I arrive on site. I'll tell you what, you've got me here for the day so I'll just make myself a brew and settle down with the paper whilst you pop off and get the materials for me and, oh and take your time, I'm in no rush at all, I've got all day....literally."


February 2006
We could no longer stay at Swallow Cottage which we had been renting since November 2003 so we moved into a nice little holiday cottage at Manor Farm in Cholmondley. 

More pictures and information about this topic will be available soon


February 2006
Our hens couldn't move to Cholmondley with us so they moved to Well Cottage and we had to go over each day to check their food and water and because we don't yet have any water connected we have to take it with us. 

More pictures and information about this topic will be available soon


February 2006
The joiner and roofers fit the conservation rooflight in the kitchen roof


March 2006
It snows in Cholmondley and the snow is so deep that we are snowed in, when it thaws enough we go to Well Cottage to check the hens who are all ok. 

More pictures and information about this topic will be available soon


March 2006
Alan Bradbury arrives with his digger and we dig the 170 metres of utilities trenches and lay the utilities (water, electric and telecoms) ready for connection.

Click to see more pictures and information about this topic


March 2006
Plastering is a particularly messy job. The kitchen was about to be dry-boarded and plastered and the AGA was already installed in there so there was the real potential for the AGA to become covered in plaster and damaged.

The situation called for some defensive measures to be taken to protect the AGA, therefore Iestyn switched it off and proceeded to build a solid 3 X 2 framework around the AGA which he then clad in 3/8 th's of an inch hardboard and then sealed around all of the edges around the floor and walls with gaffer tape...and  there the AGA sat, encased in it's protective structure whilst the kitchen was plastered and we are pleased to say that the AGA survived the plastering episode unscathed.


March 2006
The plasterer arrives and starts work on getting the some rooms plastered (kitchen, utility room, bathroon and a bedroom) so that we can move out of the rented cottage and into our house.

More pictures and information about this topic will be available soon


March 2006
Alan has finished the unilities trenches and now starts to sort out the general land drainage for the rainwater.

More pictures and information about this topic will be available soon


April 2006
The plasterer has finished the basic rooms so that the second fix electrics and plumbing can start.

More pictures and information about this topic will be available soon


April 2006
The water utilities always insist that the depth of the water pipe must be at least 1 meter below ground level at all times. To ensure that this is the case you can either leave your trench open for them to inspect (which means that it could be open for a week or more) or you can fill the trench back in and in doing so position a length of 100mm pipe over the water main every 20 feet or so with the pipe sticking up vertically and poking out of the ground so that the inspector can shine a torch down and check the depth.

The water utilities inspector visits site, inspects the water main and signes us off for approval for our water connection, now we just need to wait for them to come and connect us up.


April 2006
The plumb suppliers drop off the bathroom suite and furniture which is all flatpacked. Iestyn then spends a couple of days assembling it ready for the plumber to fit.


April 2006
Steve and Karl the tilers come and tile the bathroom floor so that the bathroom furniture can be fitted.


April 2006
The electricity company drop off the white meter box for us and Iestyn installs this.


April 2006
The electricity company come and connect up one end of the cable from our utilities trench to the meter box we have installed.


April 2006
Phil Gregory the plumber now comes back to fit the oil fired boiler and do the second fix to get a working kitchen sink in the utility room and a working toilet and bath in the main bathroom so that we can move into the house.

More pictures and information about this topic will be available soon


April 2006
The electricity company send out an overhead crew who take the other end of the power cable from our utilities trench down our drive and connect it up to their network at up the overhead pole.


April 2006
BT send an engineer out to connect our phone line up, he connects the house end up fine but unfortunatly the engineer does not climb ladders so he can't finish off the installation because the other end of the cable is poking out of our trench at the bottom of the drive by the BT pole as requested and it needs to be connected up at the top of the pole and apparently he will need to request that they send out a platform crew to complete the work!


April 2006
Iestyn fits the kitchen cupboards in the utility room


April 2006
It is another 8 days before the BT platform crew, (two engineers in a huge cherry picker platform lorry) arrive, however they end up just using a ladder to connect us up (I'm sure that there is a joke in there somewhere) and at last we have a telephone.


April / May 2006
Tony and Craig the electricians come back, Tony fits the breaker fuses and suddenly we have electric. They get some power into the basic rooms for us to use and get the underfloor heating pump running for the first time.

More pictures and information about this topic will be available soon


May 2006
Phil Gregory the plumber finishes getting the bath and toilet working.

More pictures and information about this topic will be available soon


May 2006
Tony and Craig the electricians are finishing getting the basic sockets and lights working for us whilst we are moving into the house on the same day.

More pictures and information about this topic will be available soon


April / May 2006
We finally move into our house Well Cottage

Click to see more pictures and information about this topic


May 2006
Steve and Karl the tilers tile the bathroom walls

More pictures and information about this topic will be available soon


May 2006
Phil Gregory the plumber comes back and finished off fitting the shower and fitted bathroom furniture, whilst Iestyn has fun with the fixed wall mirrors.

More pictures and information about this topic will be available soon


June 2006
Steve and Karl the tiles come and tile the kitchen floor in preparation of the kitchen being fitted.


June 2006
The kitchen fitter arrives along with our kitchen in bits and he begins the to start building and fitting out our kitchen for us.

Click to see more pictures and information about this topic


July 2006 
At last after nearly three weeks the kitchen has been fitted.

Click to see more pictures and information about this topic


July 2006 
Alan comes back to clear the piles of rubble from the courtyard and tidy it up so that it starts to look like a garden and not a building site

Click to see more pictures and information about this topic


August 2006 
Steve and Carl the tilers come back and tile the kitchen and utility walls between the cupboards and also behind the AGA

Click to see more pictures and information about this topic


August 2006
Because the large feature window in the master bedroom is south facing we realise that we will need an opening roof-light for the summer so Iestyn submits a planning amendment to the planning department to see if they will agree to the additional roof-light and great news they agree to it.


 September 2006
It's back on the Kingspan insulation again, Iestyn now has to finish cutting and fitting the two layers of insulation board in the roof of the lounge and master bedroom before the plasterer can begin work again.

More pictures and information about this topic will be available soon


October 2006
The joiner comes back to fit the conservation roof-light in the master bedroom. This involves removing the roof tiles where the window will go, cutting a hole in the roof and then fixing the window in place. Once done the roofers re-tile around the window and fit the roof flashing to make the window weather-proof.

The only problem was that the joiner had finished his work by early afternoon but the roofers didn't turn up at all that day and Iestyn couldn't get hold of them either. We had torrential rain that night and water poured in through the hole in the roof were the tiles were missing and the concrete floor of the master bedroom became a small indoor lake.

When Iestyn finally managed to get hold of the roofers it transpired that they had had their van stolen whilst they were working on a job, all of their tools were in the van so they couldn't even finish the job they were on, let alone get to ours.

This was a potential disaster because we had the plasterer booked in to start on the master bedroom in less than two weeks time.....

We rang around to try and get someone else but this coincided with a bout of torrential rain and wind so all of the other roofers were busy with much bigger jobs where poeples roofs had blown off.

A week later the roofers were able to come and sort the roof out, it rained every day of that week before they arrived, the weather broke the day they fixed the roof and we had sun for the next week after that.


 October 2006
Phil Gregory the plumber comes back for the first fix of the en-suite including building the shower base.


 October 2006
Kristof our new plasterer arrives to plaster the lounge, en-suite and master bedroom.

More pictures and information about this topic will be available soon


November 2006
Now that the plaster has finished in the en-suite Steve and Carl the tilers come and tile the floor in preparation for the plumber to come back for the en-suite second fix


November 2006
The plumbing suppliers deliver the en-suite shower, sink, toilet and the fitted furniture, again this is all flat-packed but Iestyn has had some experience with this previously for the bathroom so assembles the furniture with no problem this time ready for it to be fitted.


November 2006
Phil Gregory the plumber comes back and fits the en-suite out.

More pictures and information about this topic will be available soon


Early December 2006
Now that Phil Gregory the plumber has finished fitting the en-suite basics - sink, toilet and fitted units Steve and Carl the tilers come back and tile it out the completely so that the plumber can come back and fit the shower.

More pictures and information about this topic will be available soon


December 2006
With the en-suite now tiled, Phil Gregory comes back to site the shower and complete the en-suite secod fix.


December 2006
Tony and Craig the electricians come and do the second fix in the en-suite.

More pictures and information about this topic will be available soon


December 2006
Iestyn and Alison build the concrete bases in the garden for the outside lights to be fixed to.


December 2006
Tony and Craig the electricians fit the outside lights.

More pictures and information about this topic will be available soon


 December 2006
Alison and Iestyn paint the lounge and ensuite


March 2007
Alison and Iestyn start to sort out the gardens, firstly tackling the soil and rubble at the front of the house.


March 2007
Alison and Iestyn then creating some raised beds at the back.


March 2007
Alison paints the breeze block wall and it is transformed.


April 2007
The wooden five bar entrace gates are fitted on the drive


April 2007
It looks like the Good Life bug has bitten them as Alison and Iestyn start to create a vegetable plot.....well Alison supervises and Iestyn digs.


April / May 2007
Alison starts to plan Potatoes, Brussels, Broad Beans, Peas, Broccoli, Cauliflower, Onions and Shalotts.


June / July 2007
The wettest June on record and we suddenly have to harvest the potatoes quickly because they will soon rot in the waterlogged ground.
(Believe it or not our potatoe crop is so good we don't have to buy any potatoes at all until the end of November).

The slugs have a field day and decimate our Collies, Broccoli and some of the Onions.


August 2007
The little paddock is completely overgrown and before Alan comes back to level the ground we need to cut down all of the tall grass and weeds (especially the Ragwort). It is so hard going that the petrol strimmer can't cope and Iestyn has to buy a heavy duty one to finish off the job.


Early September 2007
Alan comes back with his digger and levels the piles of soil in the little paddock in the back garden and creates the hole for the pond at the back of the paddock for Alison.


Early September 2007
Alan clears the rubble rockery from the front garden and also sorts out the pothole pitted drive with 10 tons of MOT gravel.


Mid September 2007
Before we can start to prepare the ground for the turf we need to turn it over with a rotivator first of all before we can start to level it for the turf.


Mid September 2007
We also now need to build and line the inspection chanbers for the septic tank, then back-fill around them ready for the turf.


Mid September 2007
Alison and Iestyn take on the task of creating a lawn on the now flat paddock area. Firstly they rake the soil for stones, rubble and weeds.
Then Alison rolls the soil flat with the roller (gas bottle on its side). Then they add some fertiliser and it is ready for the turf.


Mid September 2007
The turf arrives on pallets, fortunately the turf people have a little forklift truck on the back of their lorry so they are able to bring the pallets around to the back of the house where the turf is to be laid.


Mid September 2007
It all seemed so easy to lay the turf at first and 250 square metres of turf didn't sound much when we ordered it but by the end of the the first 50 metres we did wonder if it had been such a good idea to try and do it ourselves.


Mid September 2007
Not ones to do things by halves we decided to do the pond at the same time, Monty helps Alison with the pond liner as she creates the pond.


Late September 2007
Having used up all of the turf on the back garden we get a bit carried away and decide to tidy up and turf the front garden as well.
Firstly Iestyn rotivates the soil and gets rid of the old rough grass and weeds. Then the same as before, raking, levelling and rolling.


Late September 2007 
The turf is laid.


Late September 2007
The plasterer is going to come back soon so Iestyn starts to finish off boarding out the loft and finishing off putting the Kingspan insulation in between the floor joists.


October 2007
Reinforcements have arrived!
Alison's mum and dad Mae and David come over to help us out. Mae makes some rather posh soft beds for our dogs Sam and Monty whilst David uses a special wood treatment to coat an colour all of the window frames and door at the back of the house.


October 2007
Iestyn finishes off insulating and boarding the loft and can now start to fill it up with things.


October 2007
The recently laid turf has really taken well and Alison starts to mow it with her tractor mower that she got for her birthday.


 Late October 2007
At last out stone steps arrive from the reclamation yard along with the sandstone corbles and York stone that we will be using to build a fireplace.


 Late October 2007
Gone at last are the two old pallets and pieces of board that we have used as a front door step for the past 18 months to be replaced by some solid stone steps.

Using old fashined methods Alison and Iestyn move the solid stone steps into position at the front door.

Iestyn has to do some careful chisseling to cut a groove at the back of the top step for the electricity pipe to go up to the meter box. 


 Late October 2007 
 

Once the steps are in position Iestyn then cobbles up to them to complete the job.


Early November 2007
Kristof the plasterer comes back to finish off the plastering, he starts with the master bedroom which we have been using as a bit of a store room and also slept in there when we had guests staying over. It is full of stuff so this has to be completely cleared out first with most things going in the loft ....or skip before Kristof can begin work.


 Early November 2007
Kristof has finished the dryboarding and preparation work putting up scrim beading and taping the joints andhas now started plastering the master bedroom ceiling.


 Early November 2007
Iestyn starts to build the fireplace surround in the lounge.
Where the fireplace hearth should be there was a void in the floor, this is because there are no underfloor heating pipes there so the floor was never screeded over in this section.

We had been using the lounge for the past year and we had simply put a sheet of chipboard over the hole in the floor, rolled some carpet over that and no one was any the wiser.

The first job was to fill the hole with concrete and level that off so that the base for the hearth was flat.

Once the concrete had been left for a couple of days to harden and "go off" we were ready to start laying the hearth.

We had bought two large york stone slabs which we layed on a bed of mortar on top of the by now hard concrete base.


Early November 2007

We let the hearth slabs sit for a couple of days to settle and then started on the uprights for the fire surround.

We had bought two large old sandstone corbels from the reclamation yard along with the york stone slabs. The corbelshad apparently come from the front facade of a grand 18th century bank in Liverpool which had been demolished a couple of years ago and the usable bits of demoliton stone had found their way to the reclamation yard.

The corbels were all individually hand carved and the ornate carved sections of the corbels which would have protruded from the facade of the building were identical.

However the rear sections which would have been embeded into the fabric of the building were of different sizes bebcasue each one would have been carved to fit and key into a specific place in the building alongside other hand carved pieces of sandstone.
 
One of the corbels was about 2 inches deeper than the other and this meant that Iestyn would need to cut that excess sandstone off of the back with a circular saw to even the two corbels up so that they both sat equally in position against the lounge wall.

Next the corbels were moved into position and then the plasterboard on the wall marked and carefully cut so that the corbels fitted snugly into the slots.

Being solid sandstone, the corbels were very heavy so we needed to make sure that they didn't fall over.

Firstly Kristof put a special bonding adhesive on the block wall behind where each corbel would sit. Then, once the corbels were pushed back into their corresponding slots in the plasterboard they were embeded into the adhesive.

Then thick steel brackets were fixed to the block wall behind the plasterboard and then screwed into the top of the corbles just to tie them in to place.


Mid November 2007
With the master bedroom plastering finished Kristof starts on the as yet unplastered wall in the lounge where we have built the fireplace.


Late November 2007
Kristof has finished the plastering in the lounge and once the newly platered wall is painted you can't see the join or tell that half of the wall was plastered 12 months ago and the other half where the fireplace is has only just been plastered.


Late November 2007
The fireplace is topped off with an old and very weathered railway sleeper which we found in the old barn where it had been used as the front of a
cattle feeder trough.


Early December 2007
When we first moved in to the house it was literally still a building site so Iestyn put in some temporary door frames and doors just to keep areas where we were living closed off from those areas that still had work going on in them which to be honest was all of the house really apart from the bedroom we were using at the time.

We now decide that it is time to start replacing the temporary door frames and doors with the real finished things and start with the doorway between the hall and the kitchen.


December 2007
We decide to go for the rustic look with the door frame, our house after all was originally a small barn and cattle shed.

We use a solid 8 X 3 inch timber which after being ever so slightly distressed to give it that worn look is cut and fixed into position and then stained with the same antique wax that the kitchen cupboards have been finished with so that the new timber matches the original oak timbers we have restored and fitted in the house already. 

The door frame is then completed with the addition of some old iron nails and hinge pins taken from some of the old barn timbers as we were restored them 2 years ago.


January 2008
Making the door frame between the hall and kitchen was a bit of an experiment and now having lived with it for a few weeks we are pleased with the look so decide to do all of the door frames in the same way. Next it is the doorway between the lounge and kitchen. This doorway is a much larger opening and we decide that we don't actually need a door here at all.


February 2008
With 2 door frames completed we that it is time to havea  go at a doorway and door starting with the master bedroom.

We build the door frame in the same way as previously out of solid timber and then start on the door itself.

We use the old pine timber door and add real wrought iron rose head nails accross the door where the timber braces run so that you get a sort of Z shape of rose head nails on the face of the door.

We have also bought some old wrought iron door straps from the reclamation yard, these are solid iron straps which would have been used on barn doors or shutters, they would have been hand made by a blacksmith and are old and very rusty but with some serious cleaning with a wire brush they are soon  cleaned up and ready to use. The door staps are fitted to the door and iron door pins are fitted to the door frames and the doors then hang on these.

Alison then stains the door and door frame in an antique wood stain to give everything that authentic colouring.

Finally the door is completed with a new Balcksmith made wrought iron suffolk door latch set.


February 2008

Next following the same process as with the master bedroom we do the same thing with the second bedroom door and door frame.


March 2008

Then we complete the bathroom and third bedroom doors and doorways in the same way as with the others.


March / April 2008

You would not believe the amount of drafts you get from between the bottom of walls and the floor if you don't have skirting boards.

For the past 2 years that we have lived in the house during its various stages of development we have had to live without skirting boards, but not for much longer because we had decided that now is the time to fit the skirting boards.

Usually when a joiner fits skirting bords in a new house it is before people have moved in so there will be no carpets or furniture and the joiner can just pile up their timber and tools to work away fitting the skirting boards around the rooms making as much mess as they like and with no obstructions.

However because we have been living in the house for almost 2 years most of the rooms (apart from those that have been tiled) are already carpeted and we have furniture everywhere.

Added to that when you order your skirting boards from the builders merchants it comes in lengths of between 3.5 and 4.5 metres and if it is sleeting as it was when our timber was delivered then you have to store it inside somewhere so that it doesn't get wet and start to warp so we had to pile all of skirting boards down the hall.

We have decided to stain the skirting to match the rest of the door frames and doors, this means that we need to ensure where possible that we use complete lengths for walls and avoid splicing two lenghts of timber together if we can. However this causes its own problems because most of the lengths of skirting are over 4 metres long and they are very wakward to cut and manouver inside the house.

To make matters worse, before we can fit the skirting in a room we first have to move all the furniture and then trim the carpet before we can even start on the skirting.

The good news is that we have finished fitting the skirting boards in the lounge, hall, kitchen, utility room and one bedrooms and we now just have the other two bedrooms to do before fitting the skirting boards is completed.


May 2008

Kristoff came back to plaster the master bedroom for us.


May and June 2008

We finished off building and fitting all of the door frames and doors throughout the house.


.